Tuesday, January 31, 2012

Help! Teaching a Kid to Sew?

I'm pretty sure it will not turn out this picturesque. From here.

My students, who are high schoolers, all know of my professed abhorrence of children, especially the littlest, tiniest babies. The older they are, the more tolerable. When they can have reasonable conversations with you, oh joy! Although one might argue that high schoolers are hardly reasonable, what with the raging hormones and underdeveloped frontal lobe and all. But in all honesty, it's because I never know what to say to kids (My repertoire is exhausted after "What's your name?" and "How old are you?"). I'm not one of those magical Mary Poppins types who walk into a room and suddenly all the kids flock over because they sense a kindred spirit. Despite the goofiness of my wardrobe, I'm more likely to be found staring awkwardly at a small human being. Telling myself "They're more afraid of you than you are of them!" doesn't really help either.

So it is with some trepidation that I agreed to teach an eight year old how to use her brand new Christmas sewing machine. Her mom, who goes to our church, says that she wants to be a fashion designer when she grows up and is really excited about making her own clothing. She's been waiting to open up the machine for a month, waiting until someone can show her how not to sew through her fingers. Well, my desire to enable others to engage in this awesomely creative pastime trumps my fear of children. That said, here are my areas of concern:
  1. She's eight. Despite majoring in psychology, I have no idea what that practically means about her maturity level and attention span.
  2. I don't know what kind of machine this Christmas gift is? I'm afraid it will be one of these. To that end, I am going to bring my own, just in case. 
  3. Will she be expecting to whip up a dress right away? When I teach people to sew, after practicing stitching on scraps, my standard first project is a drawstring bag. And then maybe a zippered pouch. Maybe then, a gathered elastic waist skirt for a third project. Will she be bored if we start there?
  4. How much should I tell her about details, like say, pressing seams or the parts on the sewing machine? Should I just call it the little thingy that holds the bottom thread and how much space you leave at the end, or the bobbin and the seam allowance?
I'm supposed to go over to their home on Wednesday afternoon. So those of you with small human beings in your homes, help! I'm looking at you, Tanit-Isis. How does one teach a kid to sew? 

Monday, January 30, 2012

DIY Anthropologie: The Dulcie Dress


Last week's Sew Weekly Challenge was Make This Look. My first attempt at another MTL was a disaster, so for my second try I figured I should probably choose a dress where I actually liked the entire look. Well, I think this is the best knock-off I've ever done. Unlike previous dresses which were merely Anthropologie inspired, this is a straight up copy, with only a few modifications.

Medium was too big.
The Dulcie Dress, originally $158, was definitely out of my price range, but due to some fortuitous fabric and trim finds, I think I was able to recreate it fairly accurately, at least for a home seamstress. I actually had the dress in my Pinterest sewing inspiration folder for quite some time, and I even liked the dress enough that I went to Anthro to try it on and study it; this definitely made it easier to copy.
Not bad for a dressing room iPhone pic.
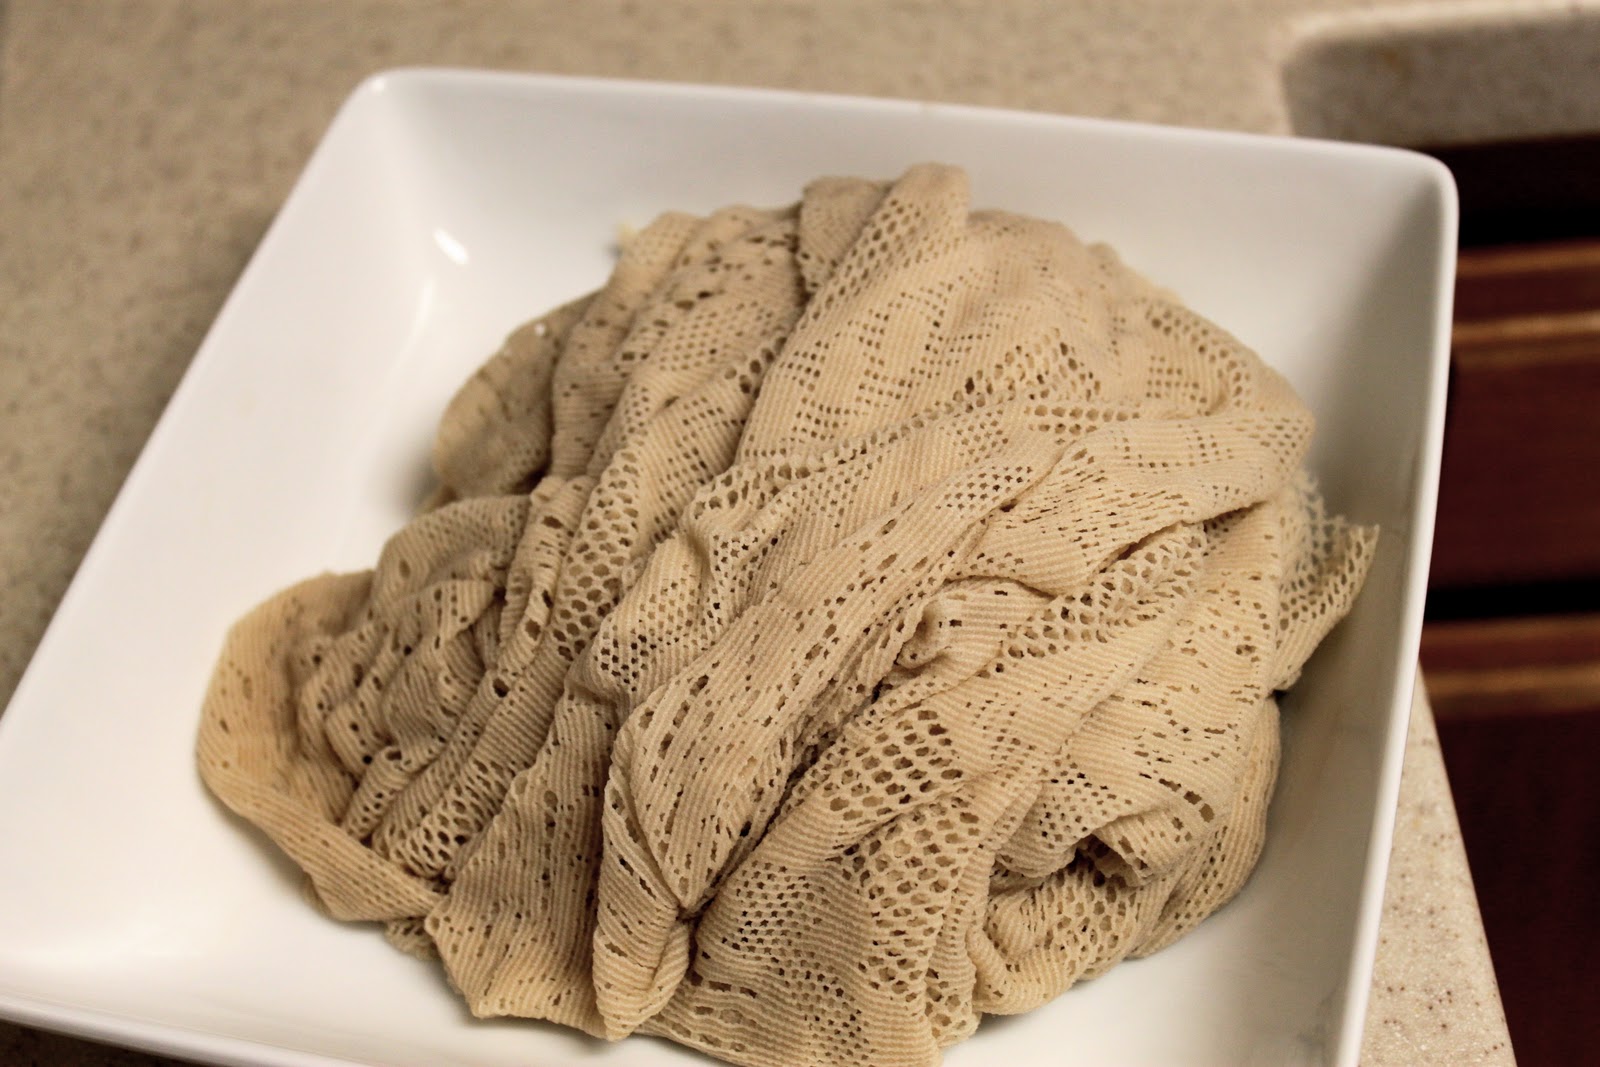
Instead of the thicker, scratchy lace lined with sweater knit of the original, I ordered the closest thing I could find, a soft stretchy nylon lace from Fabric.com. I'm thrilled that it actually has the floral+chevron thing going on! It was a blinding white, so I dyed it with tea to get this nice creamy color that suited my complexion and the pink of the skirt much better. I didn't underline it since I wasn't sure about underlining a stretchy material with another stretchy material that might stretch at a different rate. Also I didn't have any appropriate color knits in my stash and I didn't want to go buy any. This means I need to wear a camisole underneath for decency, but things could be worse.

Front view.

Back view.

The hem of the skirt.

The original dress has a tulle skirt with a bit of a crinoline underneath, but again, I found that scratchy. As luck would have it, my trip to the fabric district last year yielded this dusty rose chiffon with tiny silver threads running through it. At $2/lb, I doubt if it even cost me fifty cents. I didn't want a super puffy skirt, so I left out the sewn in crinoline of the original. The trimmings were a bit more tricky; I got a stretchy velvet ribbon attached to ruffled organza and pale pink grosgrain ribbon for the tie belt, as well as some pale pink silk dupioni bias binding for the neck and armholes from F&S Fabrics. My trims are all lighter than the more grayish-burgundyish colors of the original, but I think I captured the overall look pretty well.

Silk dupioni bias tape and the belt trims.

Besides the obvious fabric and trim differences, I also made my dress silhouette a little differently. I didn't like the crew neck, sleeveless top of the original, so I made mine a scoop neck with more cap-like kimono sleeves. The larger neck hole meant that I could also omit the keyhole detail in the back, which is good because I forgot to buy a tiny pearly button to close it.


Actually putting the dress together was pretty simple; you can totally make your own if you have fitted T-shirt to trace and a sewing machine that does a zigzag stitch. No serger or other fancy stitches needed! Apologies if this quick fake-torial is hard to understand; it was sketched very quickly.


Right click and choose "Open Link in a New Tab" to get the larger image. This assumes you know how to sew fabric to elastic and use bias binding and do a narrow hem.

Close-up of the inside of the waist.
Again with the forgetting to wash out the marker.


Summary:
Fabric: 0.75 yards of 100% nylon stretch lace, dyed with tea, 1 yard of some kind of synthetic chiffon with metallic threads and a little bit of stretch, both about 54" wide
Notions: elastic for the waist, silk dupioni bias strips that I ironed into double fold binding (most annoying part of the project because it was the wrong size for my Clover bias tape maker!), stretch velvet ribbon with ruffled organza attached, grosgrain ribbon
Hours: 8? I swear, one hour was just the bias binding ironing. And then trying to pin it to the neckline and armholes was another fiddly hour.
Techniques used: Bias binding edges? zigzag stitching knits to elastic?
Will you make this again? Maybe in less fiddly fabrics? Sewing with the lace and the chiffon wasn't as bad as I was afraid of (I made sure to use a needle meant for sheers when doing the chiffon, and a ballpoint for the lace), but I'm still not in a hurry to repeat the experience. I like the general silhouette of the dress, and the elastic makes it really comfortable to wear, so maybe when I have more stable, casual knits to work with.
Total cost: The lace cost $10.47, but I used only half, and the trimmings were quite expensive at F&S ($11.51!). With the elastic and everything, the cost of this dress was probably around $20. About four times my normal, but considering that none of the fabrics were thrifted, and that I was trying to recreate a specific dress, I'd say it was not too shabby! I saved $138!
Final thoughts: I love how dreamy and floaty this dress is! It's going to be perfect to wear to one of the several spring weddings we're supposed to go to this year.

So floaty and swishy! And I clearly need to work on holding my arms less like a robot when I walk.

I'm also really enjoying these nude estate sale gloves that I got for $3 at F&S! Normal gloves at department stores have super long fingers, but my short stubby hobbit hands fit nicely into these vintage ones. I love the little bow at the wrists, too.

Friday, January 27, 2012

Dyeing Nylon Lace with Tea

I've decided to scrap my original Make This Look Idea, and go for a different dress instead. In order to do that, I needed some cream-colored lace. I had this brilliant, blindingly white stretch lace that I ordered from Fabric.com that was perfect for what I had in mind, other than the blinding part. So, obviously the solution is to dye it.

Comparison of the tea-dyed lace and the original, blinding white version.

I knew that it was possible to dye nylon with tea by using an acidic bath (usually man-made materials, like polyester and acrylic, are impossible to tea dye, but nylon has a unique chemical make-up). The result is a nice, antique-looking, beige cream-colored lace. I like dyeing with tea because it's pretty hard to mess up, as long as you aren't looking for a very specific shade of beige. No tricky measuring or timing required, and you'll never end up with too dark of a shade. Perfect for taking the edge off of very white whites.


Start with a large pot of hot water (not boiling, but definitely steaming), several tea bags (I used six packets of barley tea from our local Japanese market since there are no tags attached to the bags), and a handful of salt.

I used our largest stock pot, the outside of which badly needs washing.

Simmer until it's nice and dark.

Double, double, toil and trouble...fire burn and cauldron bubble...

It certainly looks as if it could've been eye of newt and toe of frog, instead of just over-brewed barley tea.

Take out the tea bags, dump in your nylon fabric and swirl it around, making sure that every part of it gets good and soaked. Stir it for a good ten minutes, make sure that the water is still steaming but not boiling. The heat helps the tea color bind to the cationic amino groups of the nylon.

It will look scarily brown, but fear not!

Add in about a cup of vinegar and let it all swirl around for another ten minutes. The vinegar acts as a mordant, which helps the dye to "take," so that it doesn't just wash out. Pull out the fabric, drain, and let it cool.

At this point, it smelled like death and looked like a weird brain/turkey.

Once it's cool, rinse it well with cold water until the liquid squeezed out runs clear. Let it dry, and then you can use it!

Much better. Nice and creamy.

Alright. Let's see how long it takes to cobble together this dress.

Thursday, January 26, 2012

A Brush With An Internet Celebrity and More Qipao Construction Pictures

Link.

I'm still kind of in shock.

From here.
In case you didn't know (what, the superhero dresses weren't a dead giveaway?), I'm a huge geek. Some of the things I geek out about are dinosaurs, clever webcomics, and dystopian future literature. So when a friend alerted me that none other than Ryan North, the creator of Dinosaur Comics and the brain behind the very awesome short story anthology The Machine of Death, tweeted a link to my Superman dress, I think I fainted a little inside. Seriously, words cannot describe how flattered I am. I think the only higher level of nerd crush would be Sheldon Cooper, who's not even a real person, so yeah, this might be the epitome of a swoon-moment with a celebrity.

Besides spending a good portion of yesterday floating on clouds, I also worked on my next Sew Weekly Challenge: Make This Look. To be honest, I'm not loving my dress. I'm wondering if I should just finish it so as to avoid having a UFO hanging around, or just move on to the next project. The psychology of sunk cost makes me feel like maybe if I just worked on it a little longer, I might end up liking it. We'll see.

Frog and snaps to close up top, zipper on the side.
Anyway, I also took a few more pictures of the insides of my qipao, just in case anyone was curious. I'm always wondering what the insides of garments look like, so I love it when other sewists post those detail pics. If anyone's thinking of making their own qipao, hopefully it will help them out with visualizing the pieces. That said, I'm also putting up these photos partially to shame me into making my insides nicer.

Nicely sewn snaps, not so much with the frog.
To give you an idea of how the side closed up.
Also so you can see how I didn't finish washing out the marker.
I really like how underlining feels, but am not so keen on how it looks, since the stitching on the darts is visible. Although I guess if I used white thread it would be better, but still. I guess I could put an underlining and a lining, but I don't fancy that many layers underneath. Oh well. Maybe I should just wash out that marker; that might help make the insides more presentable!

Or I could just go back to thinking about how something I sewed made Ryan North happy.

Wednesday, January 25, 2012

Finished Qipao Pictures, In the Mood for Love Style!


I think anyone who has ever made their own qipao/cheongsam has drawn some inspiration from the movie In the Mood for Love, which has Maggie Cheung wearing several beautiful, non-traditional pieces. Adey of the Sew Convert and Juebejue of Petite Republic both spotlighted several of the costumes from the movie, and they are indeed fantastic. Unfortunately, I have never seen that movie, nor, I must confess, do I have any particular desire to. But I can still channel the look in my pictures, right? My husband and I waited until sunset to do our shoot on the top of the parking structure, and I think he captured the golden glow quite nicely!


It's almost like a heart on my back! And on my butt, but let's ignore that part.
After the powder-blue brocade qipao I had in high school, and then the classic bridal red and gold brocade for my wedding banquet, I knew I wanted to make a more utilitarian, but still pretty, non-brocade version. Hence the Bangladeshi cotton from England. It's a bit hard to see the true colors in this shoot, but if you look back at my blog posts about the making of this dress, you can get a better idea of the lovely cream and indigo flowers. I was really pleased with how I placed the pattern in the front and back, so that the ups and downs of the flowers matched up nicely with the darts. I didn't have enough fabric to match it on the side seams, but oh well.

I'm not going to say too much more about the construction, since I've already blathered on about it at length, but I'll add a bit about the fit that I didn't notice before. The side zipper tends to produce an awkward bubble unless I keep tugging the dress down, but it's not too big of a deal, since, as my husband thankfully reminds me when I'm ready to relegate a less-than-perfect dress to the back of the closet, no one will notice except me. And other seamstresses, but that's beside the point. I am happy to report that I can sit down in the dress, although since it's thin cotton it does wrinkly something fierce. I tried to strike a balance between being able to walk, and being able to wear this to church, in determining the length of the side slits. None of that scary up to the underwear slittage for me, thank you.

You can see the awkward bubble under my arm. You can see the awkward face I'm making, too.

That slit's not scandalous at all, right? Although the non-matching side seams might be.

Summary:
Fabric: 2 yards of 40" 100% cotton for the shell (barely enough, with my mistakes!), pre-washed muslin for the lining
Notions: 1 package purple bias tape, several tiny snaps, a 14" cream polyester zipper
Hours: Hoo boy. I'm going to say...at least 15.
Techniques used: Making frog closures! Which was the whole point of the original Sew Weekly challenge that inspired this dress -- the challenge of buttonholes. Do azn buttonholes count? Also, I don't know that this is a technique per se, but I've never done so much darting/fitting as I sew. This dress also marks the first time I've sewn/used snaps. Ever. I love them so much; I think I'm going to try replacing the side zipper with snaps next time I come across a vintage pattern with a side closure.
Will you make this again? Not for a long time. By which point all the pattern modifications I made probably won't be relevant anymore. But really, I don't see needing a whole lot of qipao, even if they are made of non-brocade.
Total cost: $20 or so, since I don't remember the exact price of the cotton. But all the materials for this came from my stash, so I still feel pretty good about it.
Final thoughts: My husband says I look like a less scandalous version of Chun Li. Um. I guess I'll take that? Anyway, while it's still not perfect, I'm really pleased with the level of fit I was able to achieve for a self-drafted sheath dress. Also, it felt so great to be able to figure out the top/side portion by myself! After a week of wibbling, I now have a pretty decently fitting new qipao!

In the mood for...pushing down this wall.

Tuesday, January 24, 2012

Before the Blog: Self-Drafted Pencil Skirt

Just because I happened to be wearing it and feeling nice about it.
Most of the things I sewed before I blogged aren't really worth documenting, as they're mostly elastic-based. However, since I was wearing one of my first "real" projects, made back in 2010 (wow, that was ages ago!), I thought I'd get a couple of pictures of it. I had gotten sick of of making no-pattern-required-since-it's-just-two-rectangles-elastic-waist gathered skirts, so I decided to make the opposite: a fitted pencil skirt with an invisible zipper. This was definitely in my fearless sewing period -- I had no idea what I was doing, but I was determined and just brazened on through and made what was actually a surprisingly nice skirt...in quilting cotton. Also, it had no vent, so every time I had to go up two flights of stairs to the copy room at my old school in SD, I cursed my lack of foresight.

I used this excellent tutorial from Mademoiselle Chaos to make my skirt pattern, and I think I might even have it somewhere still. I should really try to find it, as it made an astonishingly good fit! Besides putting in a vent, the only other thing I would change is to add a waistband, just for a more finished look. And also take out the belt loops. And also use a more appropriate fabric, like a nice wool blend. And use a blind hem instead of just stitching a blatant line across the bottom. And use a nicer lining fabric, not some thick polyester nightmare from the thrift store. And make sure my invisible zipper is actually invisible. But aside from all those things, I actually really like the fit, the length, and even the subtle pattern. And since it's made of extremely durable fabrics, I can just toss it into the laundry with no fear. Anything I don't have to hand-wash or dry-clean is excellent in my book, even if I have to iron the heck out of the cotton afterward.


My horribly non-invisible zipper. I decided that it was neat enough to just wear the skirt anyway.

Sometimes 2010 me impresses 2012 me, that I took the time to do such nice darts and get such a good fit.

Even if my hook and eye stitching is atrocious, at least I took the time to hide all my lining raw edges! Also, you can see the scale pattern on the fabric here. It is ridiculously hard to photograph.

Summary:
Fabric: 1 yd remnant of gray quilting cotton with a vague scale pattern, thick cream polyester lining
Notions: invisible zip, hook and eye
Hours: Gosh, I do not remember, but probably at least seven hours
Techniques used: Drafting a pattern based on my measurements, making my own belt loops?
Will you make this again? I want to, with all the changes mentioned above, but I also don't like wearing pencil skirts much, even though I love how they look.
Total cost: about $6, if I remember correctly...even back then I loved remnants and thrifted fabrics!
Final thoughts: This is one of the few me-made neutral pieces I have. I guess I gravitate toward quirky and fun fabrics? I do love how pencil skirts take so little yardage, and that something so simple can look so good when fitted well. I've worn this skirt many times since making it, and it seems to be holding up fine, so I don't know how much I would need another one. What strikes me most about this skirt, though, is that 1) when I made it I didn't know that I wasn't "supposed to" make such tricky pieces, and 2) how much care I took to make everything as perfect as I could in construction, at least to the best of my abilities at the time. Now that I supposedly know better and am more experienced, I think I've developed a fear of trying difficult things that I didn't have back then, while simultaneously skimping on finishing the insides of my garments. I need to recapture the best of that n00b spirit in my sewing.


No qipao pictures yet, although it's been done for a while! Between the dumpling party and people over to visit and all, I didn't have a chance to take normal pictures of me wearing my new qipao. But it's coming, I promise! In the meantime, have some pictures of the dumpling-making. Apologies if you don't like looking at raw meat.

Ground pork, chives, shiitake mushrooms, green onions, ginger, garlic, sherry, soy sauce, white pepper, salt, brown sugar, and cornstarch = the beginning of awesome.

All mixed up! My hand was freezing at the end of this.

We made two whole trays of dumplings.
They fry up so beautifully! Thankfully, we have a whole tray leftover and stashed in the freezer.


We'll end with a picture of Walnut cuddling with two red envelopes.

 
"Miiiinne...my own, my precious!"

Friday, January 20, 2012

Qipao Pattern Modifications

When you work with free patterns, or self-drafted patterns, but you don't actually have a lot of sewing or fitting experience, you're bound to end up making lots of changes as you put the garment together. These changes may or may not actually end up making it back to the pattern pieces, especially if you're me. Usually, if a garment requires that many on the fly changes, I'm totally sick of it by the end and swear that I will never make anything similar again. So those changes go unrecorded, and then when sufficient time has passed, I forget how horrible the experience was and try it again, only to end up with a headache because I know that the pattern wasn't quite right, but I don't remember what changes were required.

So to forestall all of that (because I think I actually might, in the future, make another, fancier one), and in case anyone approximately my shape is interested in the changes required for a more fitted qipao, here's a diagram showing my changes.

My notes are in red, obviously. Also, I just realized that I didn't note the armscye change in the upper front piece.

Thankfully, the busyness of the print disguises all the extra darting.
I added darts to both front pieces to help reduce bagginess/boxiness up top. Not sure if other people had issues with this, as there aren't exactly pattern reviews out there for this drawing, but I ended up putting in a tiny dart on the front flap to get it to curve over my bust area properly, and then another very long dart to take in extra fabric that kept poofing out on the top piece. As I mentioned previously, the back darts were too short, so I extended them to take in excess fabric. I omitted the sleeves, both because I didn't feel like dealing with setting them in, and because I want to be able to wear a cardigan over this without the awkward sleeve-bunching-up-underneath business. And, as I discovered later, it was good that I decided against them, as I needed the extra fabric to re-cut my upper front piece. I also ended up cutting off the bottom of the upper front piece, as it ended up being superfluous. It actually confused me for the longest time, because I thought it must have some import in the side closure. Lastly, I changed armscyes a bit to get a slight cap-sleeve look.


My modified dart. You can see the original blue washable
fabric marker lines...I should really take care of that.

If you decide to use this diagram to draft your own qipao pattern, it helps to have a form-fitting sheath dress pattern you can use as your starting point. I used my trusty McCall's 5845, but modified the four front darts to be only two. After that, it was just a matter of matching up my new darts on the bodice and skirt, then sketching a new curve connecting them.

I've finished binding the armholes and doing the side zipper, so it's just snaps and a hem, and then figuring out how I'm going to attach the frog. So close! I'll be (hopefully) debuting it at our dumpling-making party, and probably end up taking pictures covered in flour. Until then, 新年快樂, 恭喜發財, and may you or your children (or your cats) receive many red envelopes!

Our original family cat, Fenxi, makes a rare appearance on the blog. This is not his typical CNY haul, though.

Thursday, January 19, 2012

The End (and Chinese New Year) Is in Sight!

This was before I cut down the collar and added bias tape binding.

I'm getting more and more excited as this qipao starts looking more like a real garment! This is the most methodical and careful I've been about dressmaking in a long time. Or more like, ever. I've been really good about basting first to check for fit, instead of just sewing it up and then getting frustrated when I have to unpick the seam. I've been finishing my seams with seam binding, and getting better at it as I practice. Unfortunately, the insides still don't look that great, as the underlining is all marked up with washaway blue marker, and I didn't use white thread in the bobbin so the purple stitches are very, very visible. But at least it will hold up well in the wash! I've also been really thorough about fixing fit issues with extra/modified darts where necessary. 2011 me would have shrugged and left the tiny bulges and gapes, reasoning that it was good enough, but 2012 me is insisting on perfect fit! Let's hope it's not overly fitted...I've been waving my arms and such to make sure the fittedness doesn't prevent normal movement.

2011 me would have left that bagginess in the mid-back. 2012 me went back and modified the darts to take in some of the excess fabric.


Trying to figure out how the side came together was tricky. There's the upper front piece that's attached at the shoulder, but then the entire other side comes over it and buttons at the top. But how do the three pieces (back, upper front, and front) attach at the side? I was about to call my mom and ask her to find my qipao from when I was 17 and attempt to describe it to me over the phone, but then I came across this very helpful Etsy listing that shows the side snaps/zipper combo. 

I decided to bind the edges in purple bias tape, which I realize is not the same color as the deep indigo of the fabric. Reasoning behind this decision being that I have lots of unused purple bias tape leftover from this dress, and this is supposed to be stash-busting, and I don't foresee any future need for purple bias tape, and it doesn't look so bad, so I might as well. Also I couldn't think of another color that would go better.

Too blingy.
The only problem with this decision was that I couldn't find frog button closures in the same shade of purple. I went to several fabric stores, and after trying to explain to some of the more clueless employees that I meant Chinese knot, and not that-animal-you-dissect-in-bio-class buttons, failed to locate any that weren't shiny black, white, red, or gold. I toyed with the idea of gold, but decided it didn't fit with the whole made-of-cotton-everyday-wear look of my qipao. The annoying thing is that I know that the fabric store near my old place in San Diego had frogs of all different colors since it was in an Asian neighborhood. I'm pretty sure I remember seeing purple ones there. After briefly toying with the idea of making a trip to SD just to get the buttons, I decided that I should just suck it up and make my own. I mean, the whole point of this Sew Weekly challenge is to learn a new skill, right? These probably aren't quite the buttonholes that Mena meant, but oh well.

I sewed my bias tape into a tube, then proceeded to start looping it around to make the frog. I tried following these directions from the very informative blog Bridges on the Body, but the resulting loop was huge and way too overwhelming on the dress. It probably would've been better if I used thin cord instead of bias tape, but I couldn't find any cord that wasn't super shiny. I ended up just looping bits around and holding them down until they looked right, then stitching the center to make it stay. I did use BotB's directions for making the actual knot, then I continued with my loop-and-hold method to make the rest of the frog. I would like to try making real ones with cording sometime, since BotB makes it look so easy! But then again, I don't know if I would make another qipao that would require more frog buttons.

Pinned to the dress for now.

All I have left to do are bind the armholes, insert the side zipper, and hem. Barring some huge disaster, I don't see why I shouldn't have this finished in time for Monday. Although to be honest, I've been holding my breath waiting for a huge disaster, since one seems to inevitably strike in almost every garment I make.