Wednesday, November 28, 2012

A Knit Fiesta Dress


Considering it's still part of my series of knit dresses meant to accommodate the effects of Thanksgiving eating, maybe I should have called it a siesta dress instead.


Ever since I saw Debi's brightly-colored "Ring of Fire" Dress last year on the Sew Weekly, I've wanted to make my own version of a "squaw" dress (also known as a fiesta or patio dress). I just love how that gathered tiered skirt looks, and ever since I started English country dancing I've been trying to make dresses with a greater twirl factor. Even if it's not quite up to belly-dancing skirt level, it's still nice to feel my skirt spin out around me as I gate around my neighbor.


After everyone's helpful suggestions about what to wear to Wheel of Fortune, I decided to finally make something from this huge piece of teal jersey. I bought it when I hung out with Oona, and since she revealed that she's a TV star, it seemed appropriate to try making this work for Friday. Unfortunately, though, I don't like how the neckline turned out, so it looks like I'm going to have to find something else.

Making a face, although I guess you can't really tell from the side. Hmm, my eyeballs kind of look like Storm's here. 

I used Simplicity 8352, a gathered raglan sleeve top, for the bodice portion, and then added my own gathered skirt to make it into a dress. I didn't have enough fabric to manage more than a tiny ruffled tier at the hem, though. Still, the final skirt was definitely twirly enough for ECD!

The pattern instructions call for gathering the neckline of the top, then binding the edge with a self-fabric strip. Whether it was due to the width of the strip, or the bulk of the gathers, or the misbehavior of this lycra-heavy knit, I just could not get the neckline to look neat! (It also didn't help that my thread wasn't quite the right color, but I was trying to avoid purchasing anything new for this dress.) In hindsight, I should have ignored the pattern instructions and just gone with my instinct, which was to fold over the top to make a casing, and then letting elastic pull it into gathers. Right now, the neckline looks okay as long as you're not standing too close, but it's still very home-made up close, too large for my taste, and there are hardly any gathers in the back. Picking the seams out of this fabric neatly is pretty much an impossibility, so it looks like I'm stuck with this neckline. I'm also not convinced that elasticizing the sleeve ends was the best idea. Ah well, it was a very experimental sort of dress, and at least it's ultra comfy.

Horribly washed out picture, but you get the idea. Stitching in the ditch on this kind of fabric really made my machine unhappy, and since my thread didn't quite match it's still fairly visible. 


Summary:
Fabric: Three yards of some extremely stretchy mystery blend knit, but I'm guessing there's a good deal of lycra in it based on how well it recovers.
Notions: Elastic at the waist and sleeves.
Hours: Five or so, which is really too many considering what resulted. I spent waaay too much time trying to salvage the neckline.
Will you make it again? Not from this pattern, I won't! I still want to make a similar dress with more tiers, though.
Total cost: At least it only cost $3.
Final thoughts: Besides the neckline and sleeve issues, I'm not really sold on the blouson top for this fabric/pattern. While this dress is fine for everyday wear, but I don't think I want it commemorated on national television (even if I only appear in the audience for two seconds). Although I guess I'm already commemorating it here on the internet. I do love this shade of blue, though!

Trying to fake a Duchenne smile and looking happier than I actually feel about this dress. 

Monday, November 26, 2012

A Post-Thanksgiving Dress


After all the eating that comes with Thanksgiving weekend, it seems only right to live in stretchy knit dresses for the next week, right? This is just the first of a handful of knit dresses that I pounded out, just in time for the after-eating bulginess. Also, a sturdy elastic belt is as good as tummy-control shapewear.


Back view.


Actually, Mr. Cation and I didn't really do an excessive amount of eating for Thanksgiving; it was the first major holiday since we started dating where it was just the two of us (three, if you count Walnut), so we didn't bother with a huge fancy dinner at all. I think our families were slightly taken aback when we told them we were just going to make beef stroganoff for dinner, but hey, red meat + butter + sour cream + white carbs = my idea of perfection (also my science teacher side's idea of heart disease in a meal). Most of the time, we try to eat lots of fruits and veggies and non-processed foods like the neo-hipsters we are, but sometimes (and Thanksgiving seems like the right time), a little regression is nice. Also, Walnut loves it whenever we make anything that involves red meat; he goes crazy with whining and head-butting until we give him a tiny bit. And by tiny bit, I mean a piece of meat the size of an "o" in 12 point Times New Roman.*
This is Walnut's "real, non-processed food is imminent" face.
Sometimes I look at his pictures and I think he doesn't even look like a real cat, just like some big, fluffy, impossibly cute creature. 

Anyway, this dress has the same basis as my Travel to Work Dress, what with the crossover front bodice and some-fraction-of-a-circle skirt. I used my not-a-Renfrew pattern to make the front bodice pieces as follows:
The solid line is the original bodice piece, and the dashed line shows what the modified piece should look like. Although in all honesty, I didn't think to extend the side seam to allot for curving under the bust when I sewed mine, so the side seam doesn't lie perfectly straight. You would need to cut two of these crossover pieces, making sure that they're mirror images of each other, and then gather or pleat the shorter side before sewing the side seams in order to get it to cross and end under the bust, if that makes sense. 
You can see here how my side seam pulls forward where the short side attaches.
The pieces are pretty snug under the bust as well. 

The construction is pretty much the same after that, except for adding the sleeves (I sewed them in flat), and that the skirt just has two pieces.

Summary:
Fabric: A little less than 3 yards of 54" wide cotton jersey in this quirky fish scale-ish print. I got it a year ago at the FIDM scholarship store, but it wasn't until I got my brown boots this fall that I felt inspired to do something with it. I was afraid that the blue/brown color combo might be a little too 2006, but I think it's okay. Actually, as I typed that, I just realized that I don't really care even if it is a little outdated of a color trend; I like it and that's really all that concerns me. Gosh, I love how getting older means getting a sense of perspective and realizing who cares what everyone else thinks as long as I like it.
Notions: Elastic at the waist to help with recovery. Aaaaaand the zipperless streak continues...
Hours: Two? These knit dresses go together so quickly once you've got a reliable knit block.
Will you make it again? Probably. Like I said, reliable block = fast and easy. Plus, I like the crossover bodice look. Good thing my Tiramisu dress pattern should be arriving soon! Also, I still want to make a crossover bodice dress where the pieces cross over the bust, not under it, with the shorter side ending right at the top of the armpit.
Total cost: $3! I am seriously going to miss the $1/yd prices at the FIDM scholarship store when I move away from TCOCC. It's gotten to the point where I think $5/yd is too much to pay for fabric. I know, I'm so spoiled.
Final thoughts: This print is a bit busy, but I love having a totally different dress from everyone else who's wearing black, dark grey, and navy blue while waiting for BART. Granted, teaching means I have a bit more leeway than say, lawyers and bankers -- I don't imagine it would go over too well if I showed up at a bank job wearing hippos. I also like that the sleeves are slightly warmer than cap sleeves, but not so large that I can't throw on a cardigan on top. And let's not forget how delightfully a circle-based skirt drapes and twirls!

With the twirly skirt and boots, these pictures remind me of River Tam dancing in "Safe." If only I could dance like Summer Glau!
Instead,  I've been twirling it up at English country dancing. 


*I do not condone the regular use of TNR, since it's a pretty boring font, but it's still better than Comic Sans or Papyrus. Seriously, my only gripe with Firefly/Serenity is the use of Papyrus. Still, TNR does have its place, and it also makes a good point of reference.

Friday, November 23, 2012

Gandalf's Less Cool Cousin, Saruman

Yes, yes, I know, Gandalf and Saruman aren't cousins.
With the Big Ben in the background, it's almost like the time when Jadis made it into England. Okay, not really. 

While I was making my Gandalf staff, I was also working on a non-light-up version of Saruman's staff. I did toy around with the idea of using an LED in a frosted, hollow, spherical Christmas ornament, but in the end scrapped it as impractical to access for turning on and off. So my Saruman staff is decidedly less cool than my Gandalf one, but that's appropriate, I think, considering that Mithrandir > Curunir.

Saruman is grumpy at being labeled the less cool of the white wizards.
[source]

Again, I started this staff with a cheap wooden dowel from Home Depot, and with the help of some craft foam and a wooden doll head, Saruman's staff came together quickly and with significantly less trouble than Gandalf's.

The most difficult part was probably getting the fins on straight, and even after all my fussing, they're not quite perfect. 


Cost breakdown: $3.50 for the dowel, $1 for the sheet of craft foam, $1.50 for the wooden doll head, and I already had the paint and varnish. Again, the total came out to less than $10!

In the end, even though the varnished craft foam really does a terrible job of mimicking the sleek metal look, I'm satisfied because hey, it was cheap, and it's still recognizable as Saruman's staff. I suppose if I had power tools, or a friend with access to a laser cutter, I could've made the fins from wood, and then applied sandpaper judiciously for a more polished look. Ehh, maybe someday. Actually, if I'm being honest, probably not. Anyway, if for some reason you're interested in a more detailed tutorial on the making of the staff, I've made another instructable!

Gandalf's and Saruman's staffs chat it up while the White Council takes a break, comparing notes on their respective owners.
"Well, Gandalf's beard is so long, I'm always getting tangled in it...it's freaking annoying, I tell you!"
"Oh yeah? What about the fact that Saruman never trims his fingernails? It's like daggers stabbing my side every time he picks me up!"


Still to come in party prep: the photobooth background. But before that, it's time to sew up some more knit dresses to accommodate all the eating we've been doing the last couple of days!

Wednesday, November 21, 2012

Happy Thanksgiving!

Here at Cation Designs, we actually celebrate THANKS-for-GIVING-me-this-plaid-thing-to-wear.

Wearing blue plaid made some people more excited than others. Can you tell who's the most nonplussed?

I try to conjure up feelings of gratefulness every Thanksgiving, but this year it was particularly easy, because earlier this week, Mr. Cation officially signed the papers for his job next year! This means that moving to LA was worth it, as now he has a real job for after he graduates. All the preparing, traveling, and interviewing paid off, and I'm so proud of the hard work he put into this whole grad school venture. And best of all, the job is in San Francisco, which means we'll be moving back to my beloved city (or at least close to it, since living in the city can be kind of pricey!) sometime next summer. I'm so excited about being close to family again, but also sad about leaving SoCal (and LA's fabric district).

It's thanks to the FIDM's $1/yd section that we even have matching family outfits. Walnut was really not a fan of taking family pictures ("Mom, this is totally embarrassing!"), which is why we're all lying on the kitchen floor. My set-up on the couch with natural light and the sofa and you know, normal positions, made him totally freak out, so we had to settle for ambushing him while he was grooming himself after dinner. Hence the awkward outtakes with his leg lifted in the air, and his long-suffering face as he's dragged into the frame in the bottom photo. Don't worry, PETA, he got plenty of treats afterward and didn't suffer any long-term psychological trauma. At least, until he grows up and discovers his little kid bath pictures on teh interwebs for all to see.


And even more exciting (or at least more immediate): Mr. Cation got called up to be a Wheel of Fortune contestant! He (and therefore, I) will be going into the studio next Friday for taping, although unfortunately his episode won't be airing until sometime next April. Goodness, those people are not procrastinators. Anyway, I have to confess, my first thought was ZOMG what am I going to wear on national television?!? I know, I know, I'm such a dork sometimes. But in all seriousness, this is my big chance to wear something fabulous (but not black, white, red, aggressively striped, or licensed...I guess that means my superhero dresses and peplum top are out!) and I'm waffling between making something new (but what??) or wearing something I've already made (but what??). Help!

Mr. Cation is such a fabulous husband, being totally supportive when school gets crazy (cooking all the meals during AP Exam season! grading worksheets when I'm overwhelmed!), letting me fill up our spare bedroom with my fabric stash, and of course, taking pictures of my garments for me. Also, secret confession time: he didn't use to be a fan of cats at all, but he knew how happy cats make me, so he suggested that we get Walnut. How sweet is that? It's a good thing Walnut's so personable (felinable?), because Mr. Cation's totally won over to the cat side now. All this to say, I'm so thankful for him and am incredibly excited for these upcoming opportunities. Oh, and it doesn't hurt that he promised that if he wins big, I can get the rest of the LOTR Legos...


Monday, November 19, 2012

DIY Gandalf the Grey Staff

After I decided that yes, I did want to throw myself a Tolkien-themed birthday party, I got all excited because that meant that I could go all out making props for the photobooth I want to have. Two of the most iconic props from the Peter Jackson movies are the wizard staffs, so I thought I'd start there. Since the Hobbit movie will feature Gandalf the Grey, and not the later, TTT & ROTK bleached version, I decided to make his wooden staff instead of his arguably cooler (but also more difficult) white staff.

[source]
I started with looking around teh interwebs to see if anyone else had made a staff. I found these three tutorials, but none of them looked enough like the movie version for my taste. After some serious brainstorming, trips to Home Depot and Michael's, and several hours over several days, I finally made one that's satisfactorily "real." In case anyone should want to make their own, I put together a step-by-step Instructable on my process. Or you can just enjoy my picture collage.

To make the staff's twisty branches, I used brown paper bag strips and masking tape. Cheap acrylic craft paint made it wood-like, and watered-down black paint is excellent for adding a weathered look. 
To make the glowing crystal, I covered a LED light with clear packing tape that I "frosted" with a watered down silver/white paint. It looks fantastic in the daytime and in the dark! 

Cost breakdown: $3.50 for the wooden dowel, $6 for the 4-pack of LED lights (each lasts 8-12 hours), and I already had the masking tape, clear packing tape, paint, and paper bag at home. So that brings my total cost to less than $10, and even if I had to purchase all of the supplies instead of using things from my crafting stash, I don't think it would cost more than $20 if you were judicious with the use of Michael's and Joann's coupons. Not bad, especially considering that the collectible version is at least seven times that much. 

My final staff doesn't look exactly like the movie version, but I think it's close enough to be readily recognizable if one is familiar with the movies. I'm especially pleased that it actually lights up, although taking the LED out of the packing tape "crystal" to turn it off is pretty fussy. I suppose I could have actually wired it up to a hidden switch so that I could just click it on and off, but I don't think I care enough. I also made a Saruman staff, but that one is honestly not as cool-looking as my Gandalf staff, probably because it doesn't light up, plus I used craft foam, which is not high-class material. Then again, brown paper bags and masking tape aren't high-class either...

DIY gandalf the grey wizard staff
If only this staff were a little more portable -- I could bring it into class and threaten my students who are in danger of failing.

[source]

Thursday, November 15, 2012

Finally Finished: Toggle Jacket!

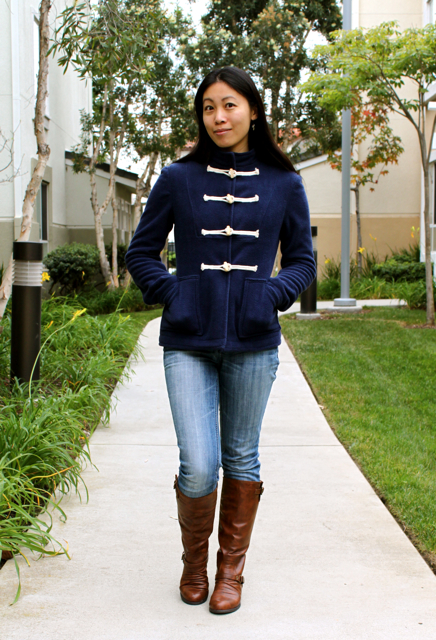
That's the smug smile of a real sewasaurus. 
I've always felt that one couldn't be a real sewasaurus, much like the Velveteen Rabbit, until one produced a credible piece of outerwear, preferably of wool. I know, I know, that's just an arbitrary standard that my brain came up with, and I know plenty of other sewing bloggers who've never made coats that I consider to be real. My brain just works in weird ways. Anyway, in my quest to sew a wardrobe appropriate for San Francisco weather, I decided that it was finally time to tackle an honest-to-goodness jacket/coat. (What is the difference, anyway? Is it length? thickness? material? personal label preference?)

ZOMG I love that the sleeves are actually long enough!

Although I've got a lovely piece of red wool coating laid away, I'm too much of a chicken to dare working with it just yet. I decided to make a more casual, more machine washable, wearable technique-muslin* of sorts out of navy blue anti-pill fleece instead. At $5/yd on sale at Jo-Ann's (plus my teacher discount of 15%!), it's definitely cheap enough that I feel free to make mistakes, while still (somewhat) getting the experience of working with such thick material and the types of techniques that requires.
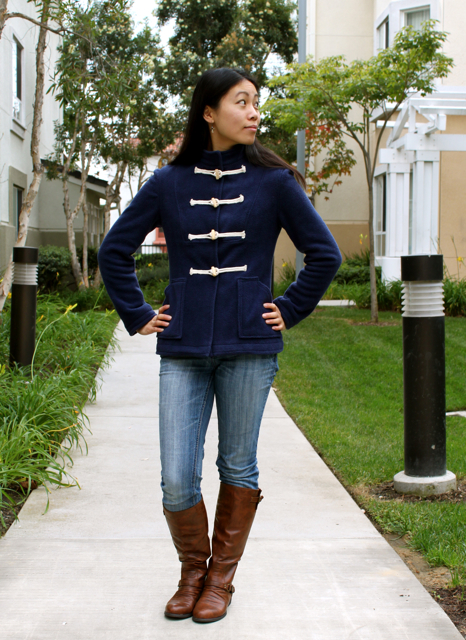
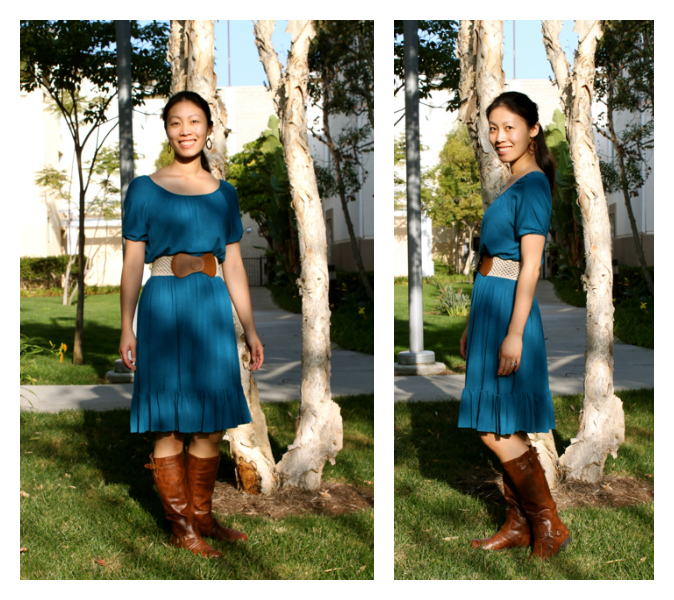
Side view.

Back view.

This project actually works nicely for R&RtRTW, too. I used to have a charcoal gray fleece jacket that I bought for cheap at one of those little Forever21-level-of-quality stores at the Tanforan Mall several years ago. It was light since it was fleece, and warm enough, considering that it was unlined and cheap. I wore it everywhere and wasn't afraid of getting it dirty since it was just fleece and could be thrown into the washing machine. It pilled like crazy after a while, though, and I sadly retired it after the beating it took in a two-week Hong Kong trip. I've missed it in the intervening years, as my wool peacoats sometimes look too formal (or are too heavy) for just going out to run errands. So this fleece jacket steps into the gap between expensive long wool coat and waterproof ski jacket.

I made View C, but even shorter.
I chose Butterick 6775 for my pattern; I picked it up a year ago at a thrift store in a big bundle of patterns, but never thought I'd actually use it. The insets just looked kind of weird, and the "semi-fitted" description scared me since I thought everything should be extremely fitted back then (now that I'm an older and wiser seamstress, I realize that outerwear shouldn't be fitted within an inch of its life, because otherwise how will it fit over your actual clothes?). When I took the pattern pieces out, I realized that the sleeve and collar were both missing; thankfully, the previous owner of the pattern had thoughtfully replaced the one-piece sleeve pattern with a two-piece sleeve from another pattern, and the collar was pretty easy to make up.

Since I only purchased two yards of fleece, I was barely able to fit in all my pattern pieces, and even then I had to make the collar shorter than I wanted. Frustratingly, I ended up cutting about five inches off of the bottom of the coat because it looked awkward at the original length, which meant I could have made a taller collar if I'd, you know, planned ahead and tried holding the pattern pieces up to my body. Rookie mistake, I know.

You can really see the sleeve head dimpling here. 
Initially, I was afraid that the jacket would be too small, since it's meant for a 32.5" bust, but I needn't have worried. That whole semi-fitted description was serious; I ended up doing an SBA on the front inset (which incidentally is a very clever design feature -- it provides shaping like a modified princess seam, but doesn't look like one at all) and shaping the side seams more by taking it in at my waist and gradually tapering to almost a 1/4" seam allowance to accommodate my hips (hello pear shape!). The two-piece sleeve was quite easy to set in once I took out the excessive sleeve cap ease and took in the underarm seam by over an inch! I mean, I know my arms are spindly, but these sleeves were really quite ginormous. I'm pretty pleased with how they look now, although there's still some dimpling at the top. Maybe I need to go back and put in an actual sleeve head.

Figuring out the toggle placement was actually one of the most frustrating parts of sewing this. I kept sewing them on misaligned or crooked, and let me just tell you that ripping seams out of fleece is so. freaking. difficult. The seam ripping frustration might also have been compounded by the fact that *ahem* I didn't baste the toggles first and just went straight for sewing them in "permanently" every time, hoping against hope that the placement would be miraculously correct. I promise, one day I will learn.

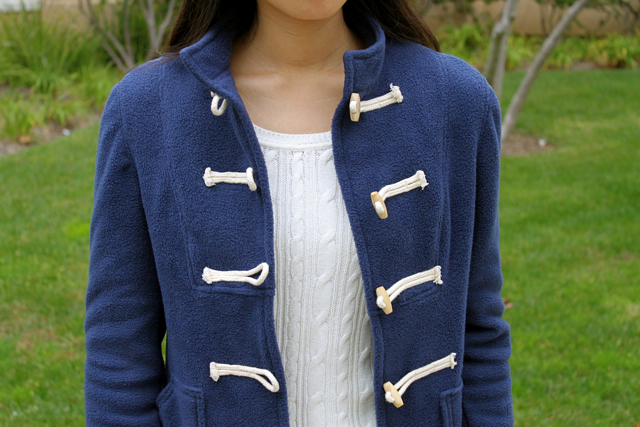
Finally more or less lined up!

The pockets were also an ordeal, trying to get them the same size and fit them onto the little space I had on the sides of my coat. I opted to make them without the flap, and with an angled hand entry like kangaroo pockets. One of my biggest pet peeves with the RTW toggle coat I already own (but wool, and much heavier than this one, so not redundant in my wardrobe) is that trying to stick your hands into pockets vertically is really awkward and uncomfortable, so this was my attempt to remedy that bad design.

In hindsight, I probably should've added stay tape to the opening to keep it from getting stretched out. 

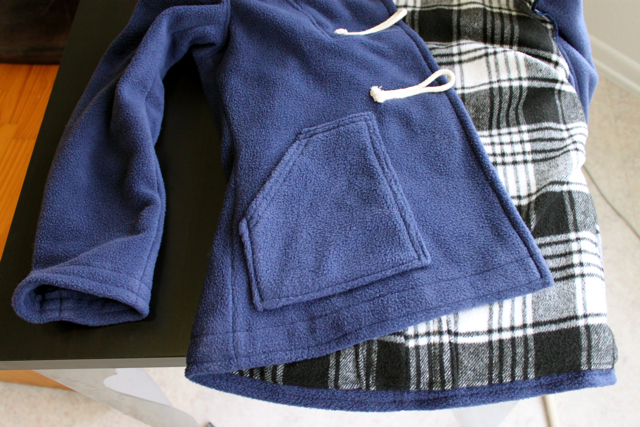
I lined the coat in this fuzzy plaid flannel; I actually cut it from a cheap RTW poncho that was gifted to me. I felt slightly bad cutting it up, since it was a gift, but I'm telling myself that I would never have worn it in its original form, and at least this way it's going to good use. Unfortunately, there wasn't enough yardage to line the sleeves, so I just finished the armscyes with seam binding and tacked it to the seam allowance at the shoulder and armpit. This makes the insides of the sleeves look really ugly, but hey, nobody's going to see it, right? I might go back and add sleeves at some point if I find a similar-looking flannel, but for now, it's fine.

Looks normal enough when the jacket flops open...

...but when the jacket's flipped inside out, you see what a lie it all is -- there's no sleeve lining! Oh, and that flannel was so loosely woven and unstable that I couldn't get the plaid to line up at the center back seam. Oh well. 
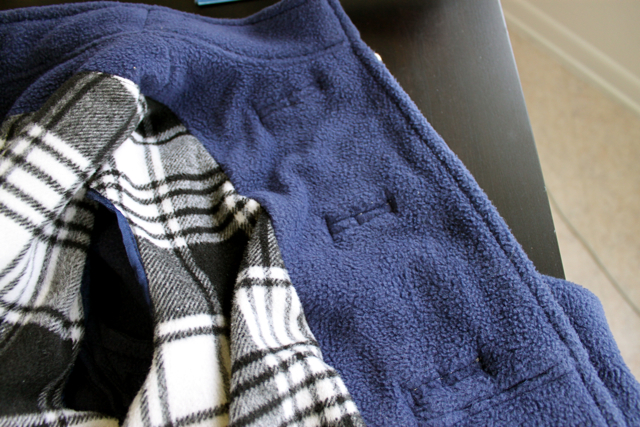
Closer look at the inside...I love how the the other side of the cording stitching looks on the facing, and the way the lining looks with the dark blue makes me so happy!

I'm thinking of adding some kind of closure to the bottom half,
like a large snap or a hook and eye, since it tends to flip open.
I'm not sure what exactly to put there, though, since I still want
to be able to wear the jacket open and a large snap might be
kind of distracting. Thoughts? 
Summary:
Fabric: 2 yards anti-pill fleece, one Korean poncho's worth of 80/20 wool-poly blend (it looked just like this, but in black and white)
Notions: 2.5 yards of cotton cord, 4 wooden toggle buttons, seam binding
Techniques: grading seams, topstitching, setting in sleeves
Hours used: Erg. A lot. I made it through a whole season of Buffy the Vampire Slayer working on this thing, and that's not even counting all the times I put it on pause to sew particularly tricky bits.
Will you make it again? I love the toggle look, and am totally intrigued by this inset feature, but I think more than one coat with this design is unnecessary. Also, as mentioned, I already have a RTW toggle coat. The two-piece sleeve, though -- I am totally using that on future coats now that I've adapted the pattern for my arms!
Total cost: $17. This is probably the ultra-discounted sale price of a similarly shapeless polyester coat at Forever21 or one of those generic Korean import women's fashion boutiques that are ubiquitous in SoCal, but I made this one so it's got extra value to it! Also, it kind of bothered me that the toggles and cording were more expensive than the actual fabric.
Final thoughts: Maybe it's one of those biased mom thoughts, you know, my-child-is-gorgeous-and-perfect-because-he's-mine sort of things, but I really really really like this coat. I am so thrilled with myself for making real functional outerwear -- it's actually quite warm (at least for California...it wouldn't begin to pass muster in a Canadian winter!) and navy blue goes with almost everything, it's casual but not sloppy, it has that vaguely military look I love because of the cording, and I get the satisfaction of saying I made it! I'll wager that it's better made than any other similarly priced fleece coat with no interfacing that you can get at the mall, and oh gosh I just can't get over that I made real outerwear! I'm totally psyched about making my red wool coat now, even though I know it will probably be next winter by the time I get around to it. And can I also congratulate myself for persevering through the 80+ degree days and trying this coat on countless times and sweating because of all the poly and wool, because now I am totally prepared for the fact that winter is coming. Seriously, I think this is the first time I've actually done season-appropriate sewing ahead of time!

Apparently winter is coming from behind me. 


*Although this isn't the pattern I intend to use for my red wool coat, it does give me practice with the techniques that I may need to use, so it's a technique muslin, get it?

Wednesday, November 14, 2012

Literal Boyfriend Jeans


Well, I guess not entirely literally, since these were my husband's jeans, but in my defense, he's had them since he was "just" my boyfriend. Anyway, in the last year he's discovered that he really likes super expensive Diesel jeans*, so it was time for these "merely tolerable" J.Crew jeans to be booted out of the rotation. High off of the success of my first real wearable pants, I decided that I wanted to refashion them into boyfriend-style jeans for myself instead of donating them. The refashion contest over on Pattern Review gave me even more of a push to finish this project, but in the end the jeans aren't significantly different enough to qualify for entry. Ah well, it's still nice to have another pair of pants to add to my wardrobe, especially since it's been getting too cold for bare legs!

Front view.

Side view. Gosh, those pointy heels look ridiculous here, like witch shoes. 

Back view. 

Funny story: I actually wore these jeans out in public before this refashion. See, the very first time I sewed a "real" dress (woven, not knit, with a zipper, from a commercial pattern), it was for a wedding in another city. I stayed up sewing until 5 AM, took a quick nap, then threw my things together into a duffel bag for the drive. The wedding was great, the dress got rave reviews, and things were peachy. That is, until the next morning when I woke up at the hotel and realized that in my new-dress-zeal-and-mad-morning-rush, I'd forgotten to pack a change of clothes. So it was either wear the wedding dress again for brunch, or borrow a pair of jeans and a belt from Mr. Cation. I chose the latter, and my friends thought I'd inexplicably decided on a bumming around, sloppy clothes kind of look until I explained my brain fart.
They're not overwhelmingly huge, but they're also just barely hanging on with the help of a very long tank top and friction. 

Borrowing Mr. Cation's jeans only worked because he's a pretty slim guy, but even then I knew I would have to take them in quite a bit to make them work for non-emergency situations. I spent an episode of Sherlock unpicking the side seams and part of the waistband, then tried them on inside-out and pinned the sides until it looked about right. Sewing the actual side seams wasn't difficult, but oh man, my cheap little Brother did NOT like topstitching! All the layers of denim almost got the better of me, especially when I was trying to reattach the waistband and belt loops, but I persevered! My arm was sore from turning the hand wheel, but it was worth it.

It was hard to know exactly how much to take out of the side seams, since this denim has no stretch to it at all. In the end, I think I could have taken out a smidge more, especially on the lower legs, but I'm too lazy to go back and fix it. 

Because of the rivets on the front pockets, I only took width out of the back pieces. This meant that the absurdly large pockets really moved out to the side. For the waistband, I just took out a wedge-shaped piece, kind of like the dart I put in my McCall's 6610 waistband. This method makes the back quite a bit higher, but whatever, it works. 

I'm pretty happy with the resulting jeans, especially since they're kind of loose, which makes them very comfortable. Only problem is, Mr. Cation isn't a fan. I tried to explain that the boyfriend jean thing is trendy right now, but I'm afraid I didn't make a very convincing argument, since even I think it looks a little sloppy. Part of that might be because I don't really know how to style them; all I know is that you're supposed to pair them with super high heels. Which I did. But that's not really practical for real life, so I'm afraid I'll just default to rolling the cuff down and wearing flip-flops and a sweatshirt, at which point I might as well have not bothered taking them in because the overall look is the same...look, I don't know. I only sew, not style.

See? Take out the heels, and it looks like I'm just wearing a baggy pair of jeans. 

Alright, let's put the heels back in so I can pretend I know what I'm doing when it comes to styling.


*Somehow, Mr. Cation always manages to find awesome deals when shopping, so even though Diesel jeans retail for an average of $200, he managed to find two pairs for $20 each. Guys, that's a 90% discount. Ugh. I waver between being impressed and slightly disgusted at his luck. Granted, these deeply discounted jeans had a few rips and holes, but that's not a problem when your wife can sew, right? I've spent a good several hours of my life repairing both pairs, and I would complain more, except that they make his butt look so good...

Tuesday, November 13, 2012

Pride Goeth Before a Fall

The last couple of posts have all been along the theme of how-awesome-is-the-online-sewing-community -- I guess that's fitting, seeing as how it's November and all. It was so nice going through and responding to all of the lovely comments you guys left for me, and seeing how incredibly empathic you all are! Seriously, why couldn't you all have been my middle school classmates?

To add to the love I've been feeling from you all, can I just say that it's been so gratifying to see all of the new dolman sleeve tops that have been popping up around the sewing blogiverse since my first round-up? Making a pattern, even if it's a free one, is kind of like throwing your baby out into the world and hoping it doesn't chew up too many people's tables or pee on their favorite textiles (obviously I know nothing about babies...this description makes it sound like I think babies = puppies). I mean, even if nobody's being forced to put out money for my pattern, I know they're still investing time and fabric into a project that I (kind of) promised would work. So seeing that it works for people makes me super happy!

Here are some of the more recent iterations of the top:

IZJ posted her make on Pattern Review (and you can too! ZOMG I can't believe my little baby is on PR.com!). See the picture here! I love that she cut the stripes on the bias! And for even more stripe-y goodness, this version has two of my favorite things: mustard color and chevrons! Wow, that's a lot of exclamation marks!

Emily took umbrage at my what-librarians-wear stereotyping, and rightly so, because her zebra print version is totally not a stuffy tweed suit. You guys know how I feel about animals on clothing, so it's no wonder I love her make!

She makes an excellent serious librarian face, right? 

Andrea of Stitch Parade made this lovely, practical, goes with everything version:

I love how she paired it with that bright necklace.

Ginger Makes (and her sister!) had a kniturday:


And Aleah of No Time to Sew made up another version, but added a skirt to make it into a dress! 

Brilliant idea. Brilliant fabric choice.

Anyway, if you've made one up and I haven't seen it, please let me know. I love seeing how other sewasauruses have taken this simple top and interpreted it for their own styles and wardrobes. And hey, if you want to review it on PR.com too, that will add to my excitement!


And now for my story: since I wear all of my own dolman sleeve tops so frequently, every time I come across about a yard of knit, I bookmark it for yet another version. Well, it got so that I thought I was oh-so-pro at whipping them up, and you all know that's a recipe for trouble...pride goeth before a fall and all that. I had this deliciously soft strawberry-stripes-on-heather-gray jersey from Michael Levine's Loft that was just enough to make the top out of. I cut out my main pattern pieces, the neck band, and the hem band, then thought oooh, I'll be clever and cut the arm bands on the bias for some cool stripey effects. Guess what I did? I cut those cuffs out of my front pattern piece. *head desk* At least I cut it off to the side, so I had two-thirds of a front piece that was still salvageable. I ended up having to piece together the rest of it from the scraps, leaving me with a surprisingly cool effect on the top. *whew*

My husband actually really liked the effect. He though I had bought this top, which, from him, is a compliment.

Yeah, this was totally a purposeful design element. Yup. Intentional. 

The back actually looks surprisingly boring in comparison. 

Sorry about the headless pictures...it was just a no-face kind of day, hence the bumming around the house in yoga pants and this top. It's finally getting fall-ish here in TCOCC, and for all that I'm glad to finally be able to wear boots and scarves, it's still slightly depressing that it gets dark so early! I blame the lack of sunlight for the brain fart that led to my cutting error. Do you ever feel like your sewing (or other brain-utilizing tasks) suffers between the autumnal and vernal equinoxes?