Sunday, September 29, 2013

September Stashbusting: Better Late Than Never?

This almost doesn't count; it's the end of September and I've been so caught up in school that I haven't even mentioned the theme this month! It's like that three-quarters-of-the-way-through-the-school-year slump in March, you know, when Presidents' Day is a distant memory and Spring Break seems forever away, and nobody's been doing their homework and a mental health day pretty much becomes mandatory for normal function...yeah, that's me with this Stashbusting Sewalong. Thank goodness EmSewCrazy is on top of things! Anyway, here's the only thing I've done this month that relates to kids:

Moles!

If you were in a high school chemistry class, you may remember learning about Avogadro's number6.02214X×1023, aka the mole. Because of this one number, the mole has been adopted as the official animal mascot of chemistry. Chemistry classes tend to celebrate Mole Day on October 23, which is still a few weeks away, but I decided that I would take a break from sewing pants muslins and try out some of the mole stuffed animal sewing patterns out there. Since I'm planning on giving away a couple of them to my top students, I need to get a head start! And teenagers still count as kids, right? And because this is about stashbusting, I used leftover bits of fleece and wool in my stash to make these little guys.

Look, it's like he's an officiant conducting a marriage ceremony! All together now: awwww...

There are two main mole sewing patterns out there: a simple one and a more advanced one. I remember my sister making the former when she was a chemistry student, but this is the first time I've made one myself in my eight years of teaching chemistry -- what a shame! I don't know how many people are interested in a review of such a niche sewing pattern, but in case anyone is interested, here are my thoughts:

Look, it's giving the other one a massage!

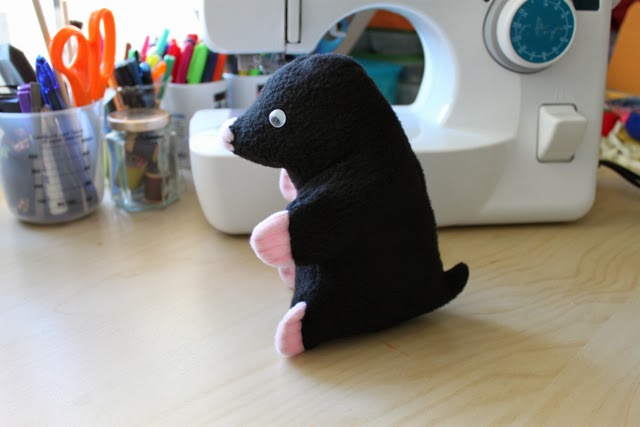
Simple Mole Pattern: This pattern is easy to sew even for someone with relatively little experience sewing, since it's made for students to do in class from felt and such. The resulting mole is smallish (7.5"x3" not including any tail one might add) but is easily recognizable as a mole. It is easier to add eyes before sewing the body pieces together, but there are no marks on the pattern for where to do so. I found the feet really fiddly to cut before sewing them to the body, and if they're not exactly the right size and placed just right, they get caught in the other seams and then turn out all warped when you flip the mole right side out. For my second mole I actually cut out tiny little rectangles and just cut the claws once I had sewn and flipped the mole body. I would've liked to have an actual tail pattern included and sewn the same way the paws are attached, instead of having it tacked on as an afterthought after it's all sewn up. Still, for the ease of sewing, you get a decent, recognizable animal.

This guy is ready for a hug, but there's no one there for him to hug...sorry dude, but I don't feel like making you a pal.

Advanced Mole Pattern: This pattern is definitely trickier, even for a sewist who's made plushies before. This pattern was designed to be able to sit up like a teddy bear, and the engineer in me really appreciates the thought that obviously went into the design (go check it out -- it's quite clever and probably adaptable for other similarly shaped animals). That said, I think the resulting mole actually looks less mole-like and more cartoon-like, which perhaps was the goal? I did really like the paw design and the cute little stub tail. It took me a little bit to figure out the odd directions (I'm too used to reading "official" sewing directions like "right sides together" and had to mentally adjust to "fur side in"), especially for sewing the neck area. If I were to make this pattern again, I'd actually change up the base/butt area to be wider than the top so that the mole would sit more stably.

Just to give you an idea of scale: here's Walnut posing reluctantly with the two matching moles. 


So there you have it -- start preparing early for Mole Day! And if you're not so inclined, you can always show off your other sewing-for-kids projects in the return of the link party...


October is sewing for others month, which means it's time for some SWAG unselfish sewing! My sister has asked for a Slytherin bolero for herself, and I should probably try making Mr. Cation a better-fitting button-down shirt...we'll see if that actually happens!


Friday, September 27, 2013

I Am A Boss

I'm not normally one to crow over my own achievements (what with being a self-effacing Asian-American and all...oh but wait, I put my life up on teh interwebs, so maybe not), but this is too awesome not to share. Besides, where else would I find people who would be equally excited about being an official fiber geek, if not in the sewing blogosphere?

To use a Barney Stinson-ism: WHAT UP.  I have no shame in being the Hermione Granger of my textiles class. Allow me a moment to bask in the glory of having the high score on our first midterm. Gosh, I love being a student again and getting praised for reaching concrete, quantifiable milestones. I have to admit to being slightly peeved at myself for missing those two points, though, because then I would've had a perfect score...what can I say, I'm a classic overachiever.

[Also, for those of you who wanted to know what textbook we're using, it's up there at the top: Textiles by Sara J. Kadolph, and my prof prefers the 10th edition since the information is arranged better, and the charts aren't white text on a red background (who thought that would be a good idea?!??!). ]

Oh wait, you're here to learn more about fibers with the help of cats, and not to see some smug celebration of meaningless academic achievement that has no bearing on the truly important things in life, like world peace and neutering/spaying your pets? Well, never let it be said that I wasn't an acquiescent blogger; I present qualities of man-made fabrics, as helpfully illustrated by more cats:

Lyocell, rayon, and bamboo are pretty much the exceptions to every statement about synthetics, since they are regenerated cellulosics. This means that they start out as actual cellulose (from spruce, hemlock, or bamboo pulp), and by the time they are extruded and dried, they once again have the structure of the cellulose polymer, so they still breathe like cotton and linen. However, the chemicals used to dissolve the cellulose to make the liquid solution result in a weaker fiber than natural cellulosics. 

Classic synthetic polymers like polyester and nylon lack the bulky functional groups of natural polymers, meaning that the fibers are very smooth and can pack together tightly, and it also leaves no options for hydrogen bonding with water. The former quality means that you can get very tightly woven cloth that is water-resistant and shiny, and the latter quality means that it has poor absorbency and is harder to dye. You know how oil and water don't mix? We call oils hydrophobic molecules, and guess what -- hydrophobic molecules love each other, which is why when you get an oil stain on a poly or nylon garment, you can pretty much assume it will never wash out. Similarly, if you wash a cotton garment with an oil stain with a non-stained poly garment, the oil may wash out of the cotton and then glom onto the poly.

Also, I never used to pre-wash/pre-shrink my synthetic yardage since I knew it was supposed to be dimensionally stable, but our prof pointed out that even though the fiber itself resists shrinkage, the way it is woven into fabric may still be dimensionally unstable, so it's best to pre-wash even the synthetic fabrics. 

Anyway, I promise I've done some real sewing, too, and not just studying and doodling in my notes. Stay tuned for one of my favorite (non-geeky) sheet dresses yet!

This is Walnut sitting on the dishwasher, staying tuned for those shrimp tails that he can see being peeled.
Look at all that gloriously non-synthetic fluff! Sometimes he doesn't even look real. 

Friday, September 20, 2013

Pants Pattern Alterations

Last week in class I tried on the muslin made from the pants sloper, which was drafted up from my measurements. I think it's worth repeating my professor's words of warning: even a sloper drafted to your measurements isn't going to be perfect right off the bat, because the way those numbers are distributed is different on every person. Depending on whether you carry your weight in the front, side, or back, a 40-inch hip measurement could mean several very different things. One's legs could be 25 inches long, but the angle at which they come out of your hip, the amount of padding on one's inner thigh, and even the way one typically stands can all make a standard draft look terrible, even if it's based on actual body measurements. Still, that said, my muslin looked pretty good for a first try -- definitely better than all the vintage 60s pants patterns I've tried in the past!

We all had to take turns changing into our muslins and standing on the tabletops and our professor walked around telling our group members what to pin and cut into to get the fit right. What helped a lot for seeing where to make alterations was having the grainline, high hip, low hip, knee, and calf lines basted in. That way, we could see where things weren't hanging plumb or perfectly parallel to the floor all the way around.

I needed two vertical darts in the front crotch area to get rid of the excess fabric there. 
There's nothing quite so nerve-wracking as knowing that somebody is seam-ripping right by your butt. 

After everyone tried on and fit their muslins, we went over the kinds of pattern adjustments that might be necessary. One of our assignments is to make those adjustments on tiny paper pattern blocks for reference, so I thought you all might like to see mine. I apologize for the blinding yellow background; we were supposed to use a stiff backing and all I had were these binder divider tabs. I think it kind of helps you see where the cuts go, though, right?

#1) Crotch curve corrections: I did the back alteration to correct the mono-butt look. By giving more fabric to the back piece, one avoids having the fabric pulled so tightly across the butt that it becomes unnecessarily flattened. 
#2) If the grainlines angle in toward each other in a V, the above correction is necessary to accommodate the angle at which your legs exit your pelvis. 
#3) Full inner thighs: start with the same alteration as #2 but make several parallel cuts up the inner thigh portion, then pull the top part out so that the gap is almost parallel all the way up the leg. The cut flaps should overlap a little at the top.
#4) Front/back rise shortening: To change the crotch only, and not the side seam length, make a horizontal cut halfway down the crotch curve, leaving a tiny bit if the side seam uncut to use as a hinge. Pivot down to overlap the pieces, then redraw the curve. 

#5) Shortening the crotch depth all around: If there's excess fabric bagging all the way around, or the crotch hangs way below your body like gangsta pants, pin it halfway up the crotch and see how much needs to be removed. Make a horizontal cut all the way across the crotch and overlap (or separate if you need more depth), then redraw the crotch curve.
#6) Knock-knee alteration: If your legs come together at the knee and then curve back out, then you need a longer inseam only. By making a downward slash and using the side seam as a hinge, you keep the side seam the same length while extending the inseam. 
#7: Full abdomen, or as my prof puts it, extra chocolate storage: Cut across the middle of the crotch right under the dart and angle up to the waist at the side seam, then put a slice down the dart. Pull the top piece up and away, then redraw the curve. 
#8) Excess fabric at the crotch: If you can pin out a vertical fisheye dart at the front or back, cut from the side seam and up the inner side of the dart, then back out to the center crotch seam (leave a tiny bit attached to use as a hinge, though). Cut flaps like in #3, then push the pieces in until the hit the outer edge of the dart. The flaps will overlap a little bit in some place and spread out in others. I know this is a little hard to explain/see on the diagram, but this method of alteration seriously blew my mind, it was so amazing. I've always wondered how to translate the 3D changes to a flat pattern, and now I know!
#9) Lengthen back rise: If your pants are snugging up too much under the butt and giving you a wedgie, lengthen the back rise by making a few horizontal cuts across the crotch (keeping the side seam attached as a hinge), and spread them out. If the side seam dents inward too much, you may need to redraw the hip curve.
#10) Hyperextended calf alteration: My prof says she sees this most in people who have danced or done gymnastics, but the bulge of the calf hitches up the lower leg in the back. Cut a slash up the grainline, past the knee, and then make two symmetrical cuts angling up toward the side seam. Using the side seam as a hinge, rotate the two sides outward. It will look flared on paper, but on the body it will hang straight. 
#11) Waist alteration: Instead of just adding/subtracting at the side seams, which is what I had been doing previously, the proper way to add or take away inches at the waist circumference is to make a diagonal slash from the waist down to the side seam, then use that as the hinge point to spread or overlap the appropriate amount.

For all of these slash-and-spread moves, we literally cut and spread the muslins while the people were still wearing them, which let us adjust until there were no more wrinkles; this also let us measure exactly how much to spread the pattern pieces. It was an...intimate...experience for all involved, and thank goodness it was only ladies in the class. I wish I could show you what some of those slashed-and-spread bits looked like for real, but obviously I'm not going to post other people's butt pictures here! You'll have to look at my slashed-and-spread hyperextended calf alteration and imagine it on abdomens and such.

Look at how many inches they had to add in with an additional strip of muslin! The prof said she hadn't had to do one in a very long time, so I guess this is proof that I really do have burly calves?
You can see the diagonal fish-eye-esque darts under the butt, the hyper-extended calf cut, and the ripped open CB seam so as to avoid the mono-butt look. Yup, I had blue skivvies on that day.

I made three of my four adjustments (I couldn't figure out that diagonal dart, so I'll have to ask the prof about that one. ETA: answer is here) and redrew my sloper, so we'll see next week how it translates into a second muslin!

Oh, and for those who were wondering, the drafting book we're using is Building Patterns: The Architecture of Women's Clothing, by Suzy Furrer.

Friday, September 13, 2013

All About Man-Made Fabrics, Now in Cartoon Form!

Welcome to another edition of Saturday School, except it's on a Friday! This week in textiles class we learned about the manufacture of man-made fabrics, both transitional (cellulose-based, but processed, e.g. rayon) and synthetic (the more stereotypical artificial fibers, like polyester and nylon). Maybe you already know about how they squirt dope (that's really what they call it!) through shower heads (that's not what they call them, but that's what they look like to me), but I bet you've never seen the properties of man-made fibers illustrated with the help of cats! Seriously, adding doodles to my notes is the only way I'm going to stay awake through a 3+ hour night class at the end of a long workday.


Man-made fibers get generic names from the Federal Trade Commission based on whether they exhibit significantly different chemical composition with specific performance characteristics. So spandex is the generic term (like tissue), but Lycra is the trade name (like Kleenex). Depending on whether the source is natural (cellulose-based, like rayon) or not (plastic-based, like polyester), the liquid solution, aka dope, is prepared indifferent ways (Step 1). The dope then gets pumped through the shower-head-thingy, or spinneret, into long filament fibers that can be thousands of meters long (Step 2). Lastly, the fibers are solidified (Step 3), and some will also be stretched so that the fibers are all lined up nicely (Step 4). 

Parent fibers, are like version 1.0...no mods to the chemical solution, generic round (and therefore hideously shiny and dirt magnifying) cross-section. Second generation fibers can have improvements (it's like when Squirtle evolves into Wartortle), whether through adding things to the chemical make-up (dyes, delusterants to get a more refined shine) or changing the extrusion rate or modding the fiber afterward. That's when polyesters moved away from the hideous stuff of the 70s and more toward the high-quality fabrics used now to make poly-taffeta that's nearly indistinguishable from real silk. The third generation fibers have even cooler mods (Blastoise!), such as when biconstituent fibers combine two different kinds of dope with different properties. For example, flame-retardant fabrics can contain a suspension of flame-retardant fibers in a matrix of softer, cottony-feeling fiber, thereby making a fabric that feels nice to wear, but won't go up in flames. Our prof likened it to chocolate chips suspended in Jello.


I think I might be the only one in the class who wants to protest each time the professor says "...but I won't go into more detail about the science of it." When going over the study guide for the midterm, I asked how much detail she wanted us to know about what causes wrinkling in cotton, and all she wants is for us to be able to say that cotton fibers don't have good resilience. The science teacher in me is all !?!A@?$& BUT THAT DOESN'T ACTUALLY EXPLAIN ANYTHING, but I have to keep reminding myself that this isn't a science class, and most people in the room aren't science-types...

Would anyone actually be interested in a little video blurb on wrinkling and fiber chemistry? I'm thinking of making one because I just think it's so cool!

Walnut demonstrates the stretching process...but I don't think he got any stronger as a result. 

Monday, September 9, 2013

A Look at Some Curves


You guys, I am so bad at this sewing + blogging + two kinds of school business! I haven't sewn anything since my Slytherin bolero, but I have thought an awful lot about protein structure and fibers. I've also finished drafting my first pants sloper for class, but have yet to sew it up. Even so, it's already been interesting comparing its shape to some of my pants patterns and RTW pants.

My initial draft, based on the pants block that the prof explained in class.  
Traced and ready to cut out in muslin! She wants us to mark (and baste on our muslins) the grainline, high and low hip, crotch, thigh, knee, and calf lines so that we can check for perpendicularity/parallelism to the floor when we do our fittings next week. I'm actually really excited to see if this is why I have all sorts of weird twisting at the inner leg on most of my pants! Also, I never knew that the back inseam is supposed to be 1/2" shorter than the front inseam, to accommodate the stretch of the bias section at the top. 

McCall's 6610 was my first "real" pair of me-made pants, but I did a lot of taking in at the legs and center back. I was never really happy with the crotch fit, and now that I compare the curve on the pattern and the teacher-approved draft, I can see why.

Look at how much more curved the McCall's pattern is!
The back curve is comparable, although I took out quite a bit in the center back seam on the McCall's pattern (said alteration is not reflected here), and not at the side seam, as it seems I should've done, at least according to the sloper. 

I also tried comparing it to the Colette Clovers pattern, and now it totally makes sense why I had to make all the adjustments that I did!

Slightly more curved at the front crotch, but the big difference is in where the legs fall. The Clovers are shifted toward the inseam. The hip is a little curvier, but not obviously so. 
Oops, I didn't line this up correctly. Still, you can see that the back crotch curve of the Clovers is much more "L" than my draft's "J" shape. But oh my goodness gracious great hips balls of fire, would you take a look at that extreme hip curve in the side seam! It's no wonder that they looked like vintage jodhpurs when I first sewed them up.

According to my professor, the usual baggy-crotch problem is the pronounced "J" shape on the front crotch curve. If you think about how a body fits into the pants, the scoop of the J is where your body sits. As she said, unless you're a man, you don't have a lot of errr...junk...to put into that J-scoop. My torso connects to my legs in a straight-ish line, so when I had the excess curve in my Clovers and McCall's 6610s, that led to awkward pooching where my legs connect to my torso, because nothing was filling in that scoop.

Here's my silly drawing to illustrate what I mean. The black line is the front crotch curve going down into the inseam, and the fleshy-colored bit is illustrating a body. When the curve is too J-shaped (as in the middle and on the right), there's all that space between the body and the fabric. Unless you're a man. My prof actually told us that when drafting pants for a dude, you need to find out which side he umm, prefers...and then make that side larger/more scooped to accommodate...things. This was an all-female class, so some people actually didn't understand what she was talking about at first. 

So, we'll see what this sloper looks like when I actually sew it up! It'll be interesting to see how the theories pan out in real life, but I'm inclined to think that my prof is correct about those curves, because 1) she's got years of fitting experience, and 2) I checked all my favorite RTW pants and the front crotch curves are all very flat, hardly curved at all. I'm really, really hoping to get some good pants out of this class!

And now that I've mentioned the word "crotch" a bajillion times, let's watch as my search keywords have a field day!